
Great support and poweful plugin.


Last updated on August 16, 2023 by Business Directory Team
How to Build a Directory Website with WordPress [5 Steps!]
Wondering how to build a directory website with WordPress? Check out this step-by-step directory tutorial on how to create a directory website with WordPress.
Ready to build a directory website with WordPress you’re proud of?
Picture this: a complete online platform categorizing and listing services or products. And this platform brings traffic and generates revenue.
Sounds great, right?
Well, you’re in luck! This dream becomes a reality with the proper guidance, WordPress, and WordPress directory plugin, regardless of your tech skills.
We will guide you to create your online directory website. Step by step.
Whether you want to build a business directory, real estate listing, or a classified site, this guide helps you get there.
So grab a seat and pay close attention!
Business Directory is the best WordPress directory plugin. Get it for free!
Let’s dive in.
- 1. Install and activate Business Directory Plugin
- 2. Adding and managing directory listings on your website
- 3. Customizing your directory website design and layout
- 4. Marketing and promoting your directory website
- 5. Advanced features and add-ons for your directory website
- Best practices for maintaining and updating your directory website
- Frequently asked questions about building a directory website with WordPress
Step 1: Install and activate Business Directory Plugin
Ever wondered how easy it could be to create your directory website with WordPress?
Well, brace yourself for a smooth ride. The first step is installing and activating the Business Directory Plugin (BD).

This is a crucial tool for creating a dynamic and user-friendly directory website. It’s the best business, real estate, or user directory plugin.
Follow these easy steps to install and activate the Business Directory Plugin:
- Log in to your WordPress admin dashboard.
- Go to the Plugins menu, and click on the Add New option.
- In the search bar, type in Business Directory Plugin and hit Enter.
- Find the Business Directory Plugin from the search results and click Install Now.
- Once the plugin is installed, the Install Now button changes to the Activate button. Click Activate to bring this plugin to life!
There you have it!
You’ve installed and activated the Business Directory Plugin.
This is a significant first step in building your directory website.
But you’re not done yet. Now the plugin will ask if you want it to create your pages. This is the easiest way to get up and running, so go ahead and allow it.
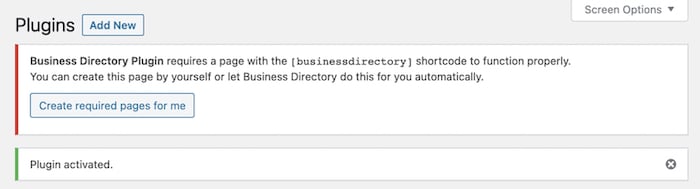
Once you click Create required pages for me, the plugin creates your directory, and you’re ready to go.
Go to Pages and find the directory page. There’s a [businessdirectory] shortcode inside, which displays your directory.
What’s great is this also creates a listing page in WordPress for you and also a submission form page to submit listings. While this form is great, if you want to spice it up a bit, we recommend using Formidable Forms as the best WordPress form builder.

You can preview the page to understand what your directory looks like so far.
Step 2: Adding and managing directory listings on your website
First things first, you need to add listings to your directory.
But how do you do it? Follow these easy steps:
- Log in to your WordPress Dashboard: This is the first step to any WordPress operation. Go to your WordPress dashboard by typing your website URL followed by /wp-admin.
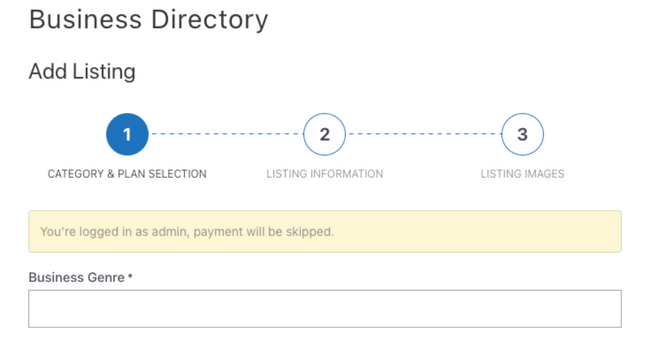
- Navigate to the Directory plugin: Go to Directory → Directory Content → Listings. Then click Add New Listing in the top right. Then fill out the fields and save it.
- Check your listings: Go to Pages to your directory page and view it. You’ll see the listings you added in the previous step.
If you ever need to manage or remove a listing, go to the Listings page to manage all your entries.
You can also import listings if you have them already by going to Directory → Directory Content → Import & Export.
You can import a CSV file or even a ZIP file containing images!
Pretty great, right?
Step 3: Customizing your directory website design and layout
Ever thought about the importance of your directory website’s design and layout?
It’s essential to remember that design is not only about looks. It’s an interactive map for your users, guiding them through your website’s information.
So let’s dive into your directory’s design so visitors have the best experience.
Choose a theme
First things first, you need to choose a theme.
WordPress offers a plethora of themes tailored to directory websites.
Do you want your site to look professional, playful, or somewhere in between? The choice is yours.
Remember, your chosen theme should align with your content and the audience’s taste.
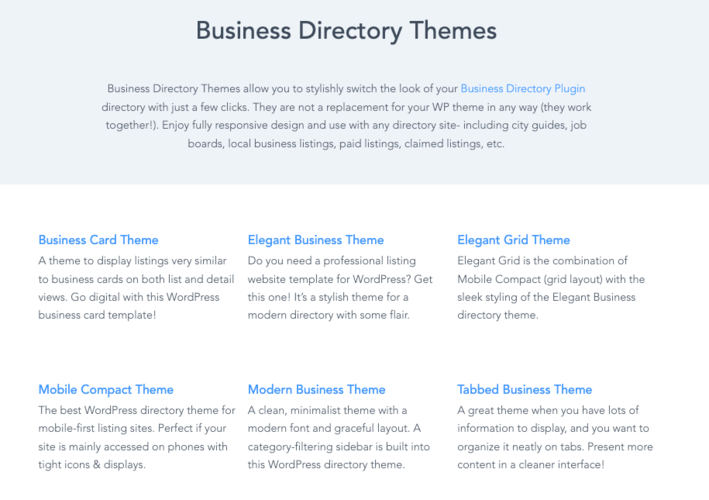
Lucky for you, though, Business Directory offers themes to use! Then it takes a few clicks, and you’re ready to go!
Here are a few business directory templates BD offers:
Let’s check out how to customize yours.
Customize the theme
BD makes it easy for you to set up your theme.
Go to Directory → Themes and click Activate on the theme you want to use.
Once you’ve selected a theme, it’s time to customize it.
Most WordPress themes come with a range of customizable options. Want to change your header image or the color scheme? It’s as simple as a few clicks.

Don’t be afraid to experiment to determine what works best for your directory website.
By default, Modern Business Theme is active. But you can also choose Tabbed Business, Business Card, or a simple Default. Other themes are available with Business Directory’s paid plans.
Choose and customize widgets
Widgets enhance your website’s functionality and user experience.
From search bars to recent posts, there are widgets for almost everything. Decide on the ones that benefit your users the most and customize them to fit your website’s design.
Remember, the goal is to create a directory website that isn’t just pleasing to the eye but also easy to navigate.
If you want to add widgets, head to Appearance → Widgets to customize what and where your visitors see them.
It’s time to let your creativity shine!
Step 4: Marketing and promoting your directory website
Isn’t it exciting to have your directory website up and running?
But wait, the journey doesn’t end there. The real challenge begins now — marketing and promoting your directory website. Here’s how you to make your website the talk of the town.
First things first, SEO or Search Engine Optimization is your new best friend.
This is what helps your website appear higher on search engine results. An optimized website is like a shining lighthouse in the vast sea of the internet, bringing all visitors toward your shores (er, website).
Remember, the higher you rank on search engines, the more visibility and traffic you get.
But what exactly can you do to optimize your website?
- Keyword Research: Find words or phrases people use when searching for businesses in your directory. Use these keywords on your site.
- Quality Content: Search engines love fresh and relevant content. Update your site with new listings, informative articles, or industry news.
- Backlinks: These are links from other websites to yours. Having high-quality backlinks boosts your site’s SEO.
Tools like Semrush and Ahrefs are great for helping with keyword research.
Besides SEO, social media is also a powerful tool for promotion.
Create engaging posts to attract your target audience. Think about it, what better way to reach out to people than where they already spend much of their time?
Additionally, consider email marketing.
It’s an efficient way to keep your audience updated about new listings, offers, or events. Remember, keeping your users engaged is critical to your website’s success.
Services like Mailchimp, ActiveCampaign, and MailPoet are all perfect to start email marketing.
Another effective strategy is partnering with businesses listed in your directory.
They could promote your website in return for a featured position in the listing or other benefits. It’s a win-win.
Your directory website is a powerful tool, but only if used effectively. Marketing and promoting may seem daunting, but with these strategies, you’re well on your way to becoming a powerhouse in your niche.
So, are you ready for the challenge?
Step 5: Advanced features and add-ons for your directory website
Now that we’ve covered setting up your directory website, let’s jump into the bells and whistles of WordPress.
How can you make your site stand out? What are the advanced features and add-ons to leverage to elevate your directory website?
Let’s explore!
First, the premium version of Business Directory Plugin adds many design and enhancement options. It’s full of advanced features to help you build a directory website that is unique, functional, and user-friendly.
So, what are these advanced features, you ask? Here are a few:
- Featured listings: Allows you to highlight specific listings on your directory website. These stand out from regular listings and attract more attention (and business).
- Custom fields: Imagine being able to fully customize your directory, tailoring it to your unique needs. With the Business Directory Plugin’s custom fields, this becomes a reality.
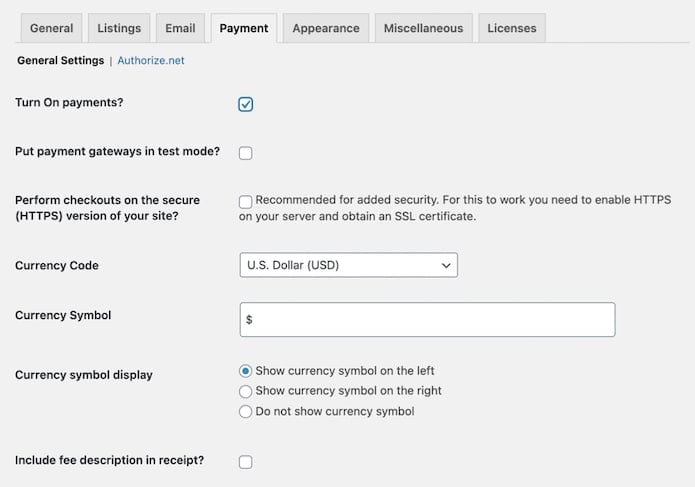
- Flexible payment options: Set up payment gateways, including PayPal, Stripe, and more. This means you offer users a wide range of payment options, making paying for their listings easier.
- SEO-friendly: The plugin is designed to be search engine friendly. From its design and structure, you ensure your website is discoverable by search engines.
These are a few examples of Business Directory Plugin’s advanced features.
But what about add-ons? Can you add anything else to your website to make it more appealing and functional?
The answer is, of course, yes.
The Business Directory Plugin also offers a range of add-ons to enhance your website further.
Here are some popular ones:
- Google Maps: Integrates Google Maps into your directory listings, making it easy for users to find business locations.
- Ratings and Reviews: Allow your users to rate and review the listings on your site. This increases engagement and trust on your site.
- Directory themes: These are unique themes designed for directory websites. They come with built-in features necessary for a directory site. Powerful search functions and listing pages are a few. With directory themes, you can manage the listings and users on your site.
Now it’s your turn!
Start with these advanced features and add-ons, and see how they transform your directory website.
Remember, the goal is to create a user-friendly, functional, and unique site that stands out.
Best practices for maintaining and updating your directory website
Ever wondered how to keep your directory website running and updated without a hitch?
Well, you’re in luck! The key to maintaining and updating your directory website lies in following a set of best practices.
These practices ensure your website functions at its best and keep it fresh and relevant for your users.
So, what are these best practices?
1. Keep your WordPress version and Business Directory Plugin updated
Keeping WordPress and your plugins updated isn’t something you do now and then.
Keeping these up to date is something you do often.
Why, you ask?
Well, updates often contain necessary performance improvements and security patches. They ensure your website is secure and working. Plus, they give you access to new features to enhance your directory website’s functionality.
So, always make sure to check for updates and install them.
2. Regularly backup your website
Regular backups are your safety net in case something goes wrong.
And they will go wrong.
Imagine losing all your hard work due to a technical glitch or a security breach. Sounds terrifying, doesn’t it? This is why it’s essential to back up your website.
Use a reliable backup plugin or opt for a hosting provider with automatic backups.
We recommend Jetpack and Backup Buddy. They both offer automated backups on a regular schedule and easy restoration.
It’s reassuring to know that with Jetpack and Backup Buddy, it’s set it and forget it.
3. Track your website’s performance
Monitoring your website’s performance is crucial.
Slow page load times and poor performance drive users away and impact your website’s SEO. Users run away from your website every second longer it takes your page to load.
So use a plugin to fix it.
Plugins like WP Rocket, SiteGround Optimizer, and W3 Total Cache help speed up your website. They get the files you don’t need or use out of the way so your site runs like a horse in a race.
4. Update your directory listings
Your directory website is only as good as the listings it contains.
So, it’s essential to keep your directory listings current and accurate.
Review and update your listings to ensure they provide up-to-date and reliable information to your users.
5. Optimize your website for SEO
We mentioned it above, but we’ll restate it because it’s that important.
SEO is critical in increasing your directory website’s visibility and attracting more users.
Optimize your website for SEO by using relevant keywords, creating quality content, and ensuring your website is mobile-friendly.
By following these best practices, you maintain and update your directory website.
Remember, a well-maintained and updated website offers a better user experience and ranks higher in search engine results.
So, why wait?
Get started today and give your directory website the care and attention it deserves!
Frequently asked questions about building a directory website with WordPress
1. What is a directory website?
A directory website is a digital data collection focused on a specific sector, region, or subject.
For example, it could be a directory of local businesses, a listing of healthcare professionals, or a catalog of educational institutions.
Imagine the Yellow Pages, but online and way more dynamic!
2. Why should I choose WordPress for my directory website?
WordPress is an incredibly versatile platform.
Its powerful features, ease of use, and extensive range of plugins make it a fantastic choice for anyone looking to build a directory website.
And the best part? You don’t need to be a tech whiz to use it!
3. What is the Business Directory Plugin?
The Business Directory Plugin is a WordPress plugin designed for creating directory websites.
It has customizable form fields, advanced search functionality, and payment processing capabilities.
This tool makes building a professional-looking directory website a few clicks away.
4. Can I monetize my directory website?
Absolutely! The Business Directory Plugin has built-in payment gateways allowing you to charge for listing submissions, featured listings, and more.
So not only can you build a directory website, but you also turn it into a steady source of revenue.
Isn’t that exciting?
Ready to build your directory website on WordPress?
So there you have it, folks! Everything you need to know to start building your very own directory website with WordPress and the Business Directory Plugin.
Ready to turn your dream website into a reality? Whether it’s a business directory website or simply running an online business, get started by grabbing Business Directory Plugin!
This article may contain affiliate links. Once in a while, we earn commissions from those links. But we only recommend products we like, with or without commissions.