
This module allows your businesses that list in Business Directory to have a Google Map for their address. You can map the address fields from any field you’ve added in the Form Fields section. You can also choose the map type (satellite, hybrid, terrain, street view) and the size of the map, as well as markers to display.
The map can be displayed on any of the following views:
- The Directory (and List) Page (showing all visible listings)
- The Search Page (showing all listings in the results)
- The Detail Page (showing the current listing’s map only)
After the maps are set up, maps will show on your selected pages. Here’s an example on a single listing view:

This example is using the Large Map and Roadmap options. The Address, City and State fields are used to map the location of Apple Computer here.
Installation
Follow the installation steps to get started.
Administration
The Google Maps admin screen is broken into several sections. This is where you will add your API keys and manage your Google Maps settings on your directory.
General settings

Google Maps API Key (REQUIRED)
Enter your Google Maps API keys here from Google. To support both map display and geolocation features, our application requires two separate Google Maps API keys, each with specific permissions and security restrictions:
See below for more details about getting setup with your API keys.
Show listings map on: Activates or deactivates the map that shows on the category page, the Directory/List page, and the advanced search page. On by default.
Current page listings to show on map
This allows you to control whether the map shows ALL listings in your directory or just the listings on the active page. If you have a LARGE directory, then changing this to “active page” will improve performance. Some large directories require too much processing to pull all markers on the map at once so this allows you to control that.
Allow visitors to get directions to listings
Turning this on will show “Get directions” where the user can enter their current address and the map will display turn-by-turn directions and a route to get to that particular listing’s location. Please note–Google’s API requires that secure HTTP connections (https) are used, so if your site is not using SSL, you may see warnings about https redirects. This is not a bug with BD, but a problem where your site is not compatible with Google’s API unless you make it fully secure (SSL). If you use this option, you also need to turn on the Directions API in Google.
Allow visitors to manually adjust the location of their listings
Turning this on will allow users on the FRONT END only to manually move a marker to a physical location on a map. This is useful if you have clients with addresses in rural areas where Google Maps doesn’t place the marker in the “proper” place.
Listing locations

These settings match up fields to the addresses used in the maps. You can select up to 5 different fields to use. Google Maps requires at least one to be mapped.
- Address: Which field in your list of form fields maps to the base address
- City: Which field in your list of form fields maps to the city
- State: Which field in your list of form fields maps to the state
- ZIP/Postal Code: Which field in your list of form fields maps to the postal code
- Country: Which field in your list of form fields maps to the country
Tooltip content
If you would like to customize the information shown in the tooltip, this is the place to do it. Field shortcodes like [name] can be used here. Other shortcodes that can be used in this box include:
- [address]: Shows the value from the field selected in the Address field dropdown.
- [city]: Shows the value from the field selected in the City field dropdown.
- [state]: Shows the value from the field selected in the State field dropdown.
- [zip]: Shows the value from the field selected in the Zip Code Field dropdown.
- [country]: Shows the value from the field selected in the Country Field dropdown.
- [url]: The link to the listing in your directory.
- [name]: The title of the listing.
- In addition, and field id or field shortname shown in the Directory → Directory Content → Form Fields page can be used.
Appearance

Appearance settings control how your maps will appear in the directory.
Use marker cluster indicators
When a map includes a lot of listings, it may start looking very cluttered and difficult to read. Using clusters will group sets of listings under a clickable number on the map.
Display map position – Allows you to control where the map appears in the listing pages selected in the Show listings map on setting. Choices: Above All Listings or Below All Listings.
Zoom level
This setting will change how close or far the map is for a single listing. When the map included multiple pins, this will always be automatic so all pins are shown.
Map type
One of the following choices: Road Map, Satellite, Terrain or Hybrid. Road Map will display the labeled streets in a colored map. Satellite and Terrain will use the images from Google Earth. Hybrid overlays the two.
Animate markers
Turns on basic Google Map drop in animations for the markers where the business is located.
Size
Map Size
The dimensions of the Google Map to display, either Large (400×600), Small (200×300) or Custom Size. Default is Automatic If your map does not fit in the width of the map, use “custom” and set the size you want. Automatic allows mobile and desktop users to receive the proper sizing and is the recommended setting.
Custom map size width
The custom width of the Google Map to display. Only valid when Map Size “Custom” is selected.
Custom map size height
The custom height of the Google Map to display. Only valid when Map Size “Custom” is selected.
Auto resize map when container is stretched
Turn this on to make your maps fully responsive on mobile displays where tablets and phones have wildly different sizes.
Using an API Key for Google Maps
What is the API key?
API keys allow developers and site owners to track usage of Google’s services on their sites via Google’s APIs Console.
Most of Google’s free services are limited to a given number of views, page loads, etc. This means that when your site goes over those limits the services will stop working on your site.
By using an API key (coupled with “Automated Billing”) you can prevent any interruption due to usage: when you hit a given limit, Google will charge you for the extra usage while your site keeps working.
In the specific case of the Google Maps APIs, the limits are as follows:
- 10,000 free requests per month
- 5 requests (of any kind) per second.
Why do I need API keys for the Google Maps module?
Most sites shouldn’t need API keys at all since limits on Google Maps APIs are very reasonable. Because limits are enforced during 24-hour intervals, even if your site goes over the limit, it could be the case that the outage lasts at most until the next day.
The Business Directory – Google Maps module uses a special kind of cache to prevent unnecessary API usage but sometimes that’s not enough.
If, after enabling the module, some or all of your maps are not being displayed and you’ve been seeing a warning about failed requests on your WP backend for more than 24 hours, you definitely need an API key.
If your maps are not being displayed but you’re not seeing a warning on the backend, you probably don’t need an API key. Please double check your settings and, if the problem persists, contact us for assistance.
If you have shared hosting, READ THIS:
When your site is on shared hosting, as the name suggests, it is sharing the same physical server resources (such as memory, CPU, etc.) with several other sites. Because all of those sites are on the same server, most of the time they’re also sharing the same IP address, regardless of the domain names being different.
Google enforces limits by looking at the IP address of your server so your site could be denied access to Google APIs even if it is not the one abusing the APIs or hitting the limits on its traffic alone.
An API key is a way to solve this issue without having to move your site to a dedicated server or VPS.
How do I get an API key from Google for use with the Google Maps module?
First, you’ll need a Google login, such as the one from a gmail.com account, and a credit card for billing.
Visit Google Developers Console and enter your login information (if asked). If there are no projects listed, create a new one or select your current project.
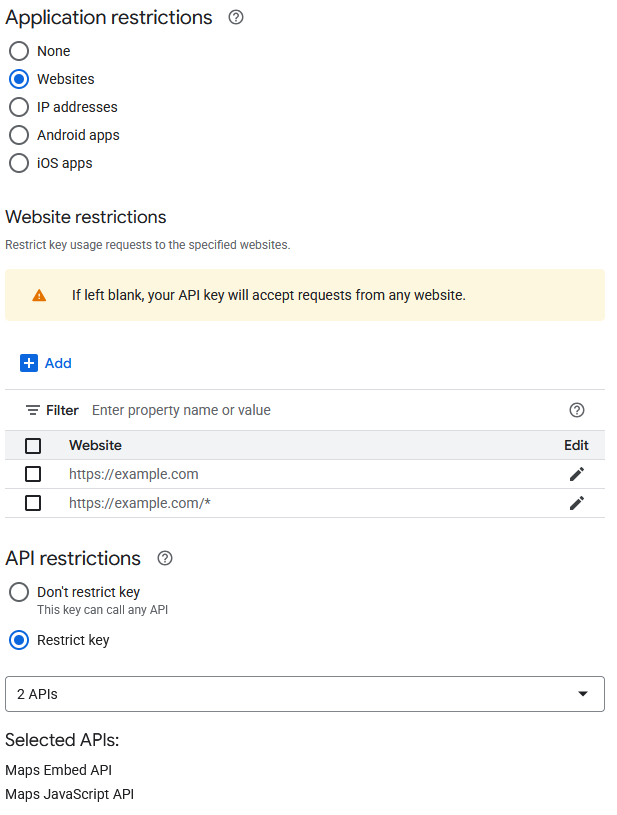
API Key #1: Add a new API and enable the following APIs.
- Maps JavaScript API
- Maps Embed API
- Directions API (only required if you plan to use the directions feature)
Restrict this API key to Websites and add your website URL to the website restrictions. It should look like the screenshot below.
Save your API key settings and paste the key into the Google Maps API Key field in the plugin.
API Key #2: Add a second API and enable the following APIs.
- Geocoding API
Restrict this API key to IP addresses and add your server IP address to the IP address restrictions. The second API key should look like the screenshot below.
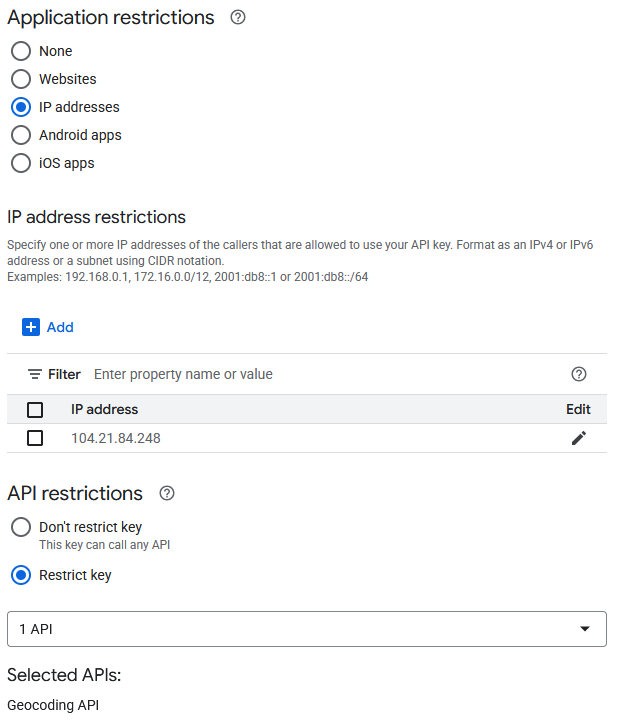
Save your API key settings and paste this key into the Google Maps Geocoding API Key field in the plugin.
API Key References
- Google Developers Console Help
- Geocoding API usage limits
- Usage Limits for Google Maps API Web Services
Troubleshooting
API Key Activation in Google Maps
There are three key areas where people run into trouble with activating their API keys when implementing the Google Maps Module.
Make sure all 3 APIs are added. The Google Maps Module requires three API, which are outlined in this article. To recap, here are the three that you need:
- Google Maps Geocoding API. (NOTE: Don’t confuse this with Geolocation–they aren’t the same!)
- Google Maps JavaScript API v3
- Maps Embed API (NOTE: If you require the directions feature, then Directions API should be enabled.)
Make sure you have billing turned on. The other issue is that Google made changes to its Maps usage accounts, and they have started requiring a payment method to be put on file. There is more information about the changes and how they may affect you at this link: https://cloud.google.com/maps-platform/user-guide/pricing-changes/ There is also a pricing sheet here for your reference: https://cloud.google.com/maps-platform/pricing/sheet/
The billing issue is the most common error we see. Here is the typical warning that Google gives you: You must enable Billing on the Google Cloud Project at https://console.cloud.google.com/project/_/billing/enable Learn more at https://developers.google.com/maps/gmp-get-started
Simple steps you can take to find the reason for the error
- Go to a page on your site where Google Maps is supposed to show.
- Right-click on the page.
- Choose Inspect from the dropdown.
- View the Console tab.
- You will see the error there if there is one.

I am getting blank maps
Blank maps can happen for a variety of reasons. Here are some possibilities:
1) You recently imported a large number of listings. If you did this, the Google Maps API has a daily limit of calls made to it and can be exceeded during the process. Waiting 24 hours usually takes care of the problem as you’ll get a new allocation of calls the next day. Once BD’s Maps module can get the geolocation data, we cache it. This is probably the most common cause.
2) You’re using a theme or other plugin that is using the Google Maps API as well. The limit is imposed for all calls made from the server, so if your other software has used them up for the day, the map is blank until it can get the data. This is less common but can happen.
3) You’re on a shared hosting plan and someone else is using the Google Maps API on your server besides you. The calls are allocated per IP address, so a shared host means shared calls. This is the least common, but we see it occasionally.
4) You haven’t mapped the listing fields on the Maps tab OR your listing doesn’t have any address/location data. Without anything to locate with, the Map won’t actually appear.
In the first two cases, the first thing to do is wait 24 hours and see if the maps appear on their own. If not, then the next thing to check is to see if the Maps are having some kind of conflict, but it’s best to know if they restore on their own first.
