
The Regions Module allows you users to filter listings based on location. You also get the ability to define the regions people can use to submit their listings, search, and edit. There is also a quick-region-set sidelist where the user can click on a region and automatically see listings filtered for that region.
Regions Concepts
Regions are set up in a hierarchy, like:
Continent → Country → State
Continent is at the TOP of the hierarchy, City is at the bottom. This hierarchy can be ANYTHING you want, but we create one for you by default (the one above) which you are free to modify.
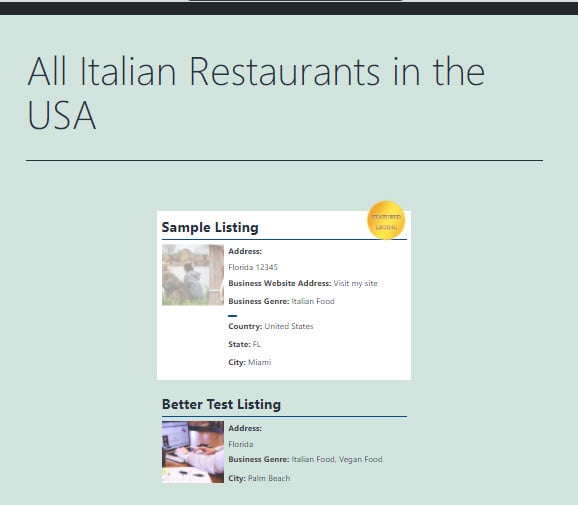
Regions are used to filter listings using the Region Selector on the main directory page:
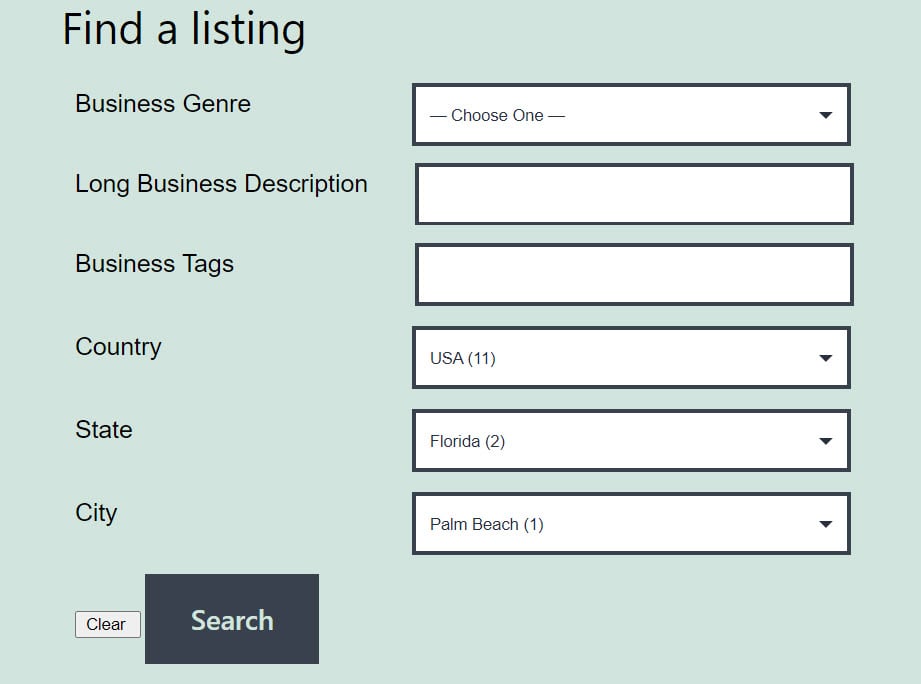
And they are also used to search for listings on the Advanced Search page
as well as the Quick Search bar:

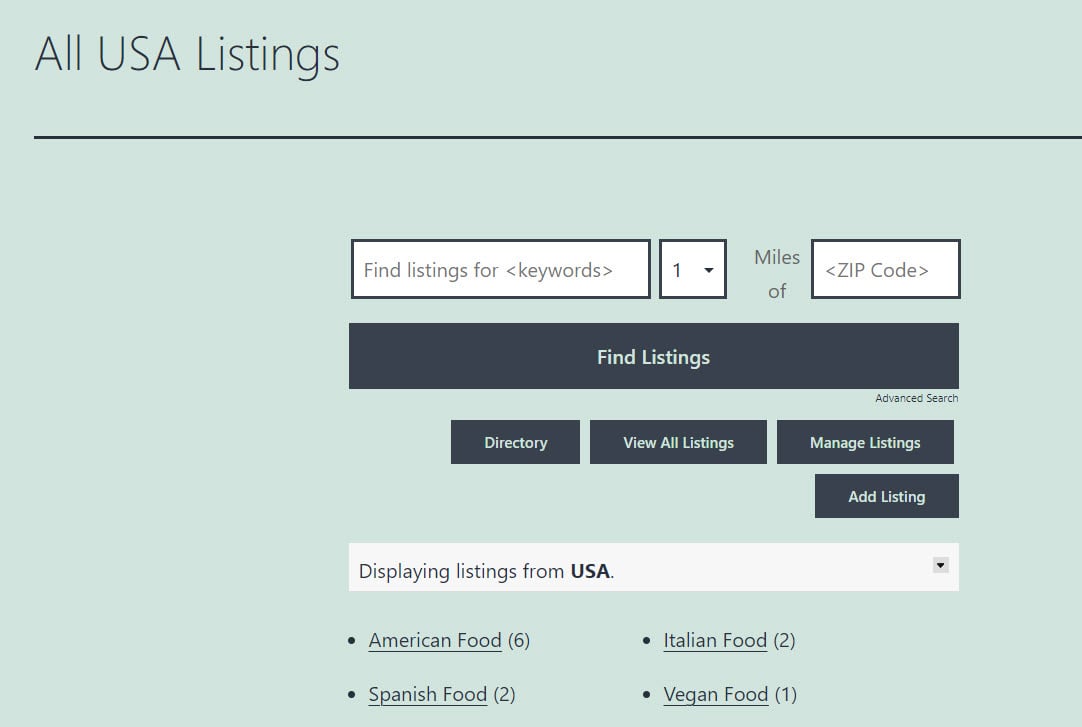
Regions are also used to filter listings using the Sidelist:
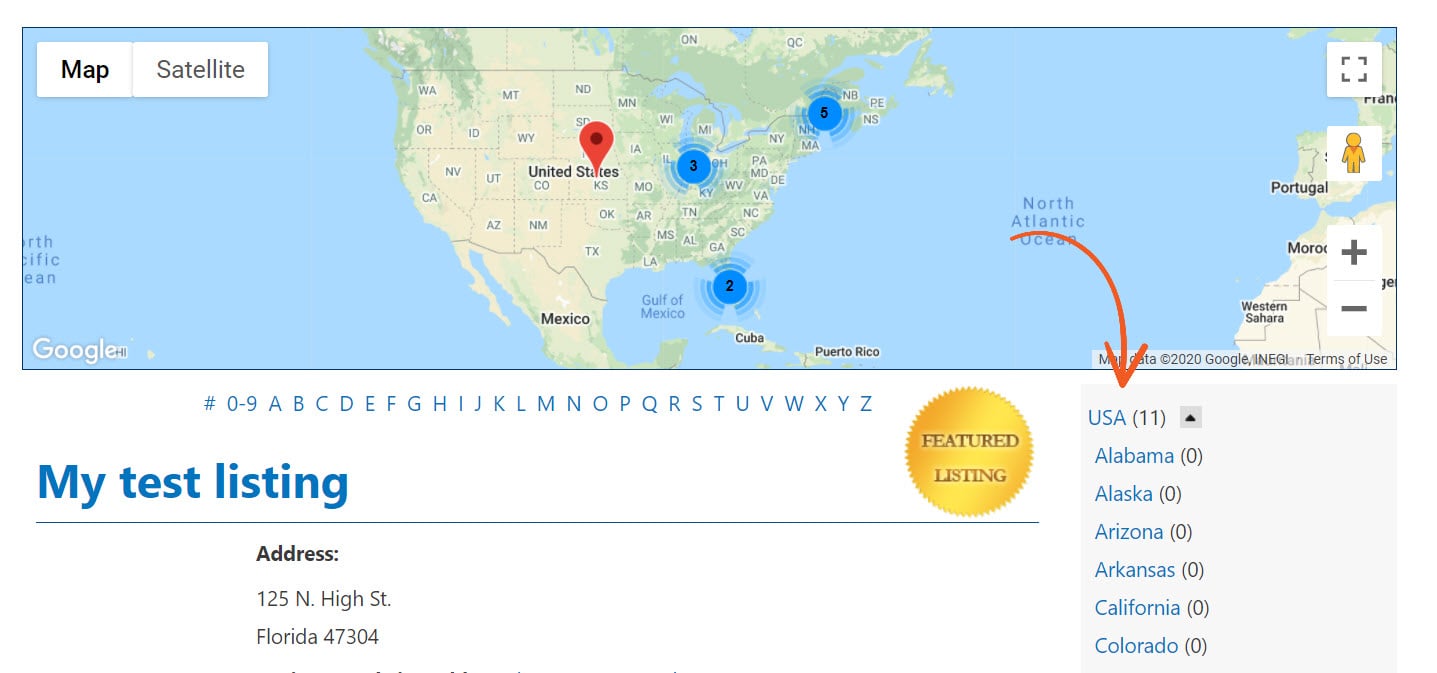
Clicking on a region name in the sidelist will restrict the listings in the view to that region only.
Regions can be defined in a hierarchical fashion, for example, Continent → Country → State → County → City. You do not need to define all those levels if you don’t want to. By default, we pre-configure the Regions module with all Continents, the Countries of the world, and the States of the United States. Additional regions and levels can be added easily to customize for your locale.
NOTE: The module does not come with states outside of those provided for the United States, and it doesn’t come with cities, counties, etc. These must be populated manually. Instructions for doing this are provided below in the Adding cities to Regions in Bulk section of this page.
Installation
Follow the installation steps to get started.
Regions Setup
To correctly configure Regions Module, you must do the following activities:
- Create and associate your regions in a hierarchy
- Change the field labels to match your hierarchy naming convention
- Decide where your fields will show up (Search Page, ListView, Detail View)
- Change the order of display of fields
That’s it. The first step is the longest. We start you out with the Countries and Continents of the world as well as all states for the USA. The rest you will need to add or associate yourself.
The hierarchy definition does not need to match Continent → County → State → City. You can have any association you like, such as Middle Earth → Hobbiton → The Shire → Bilbo’s House if you like. The important part is to understand which are parent regions and which are child regions. We give you the most common use of Regions module pre-configured, but you are free to change that (including the labels of the fields) however you like.
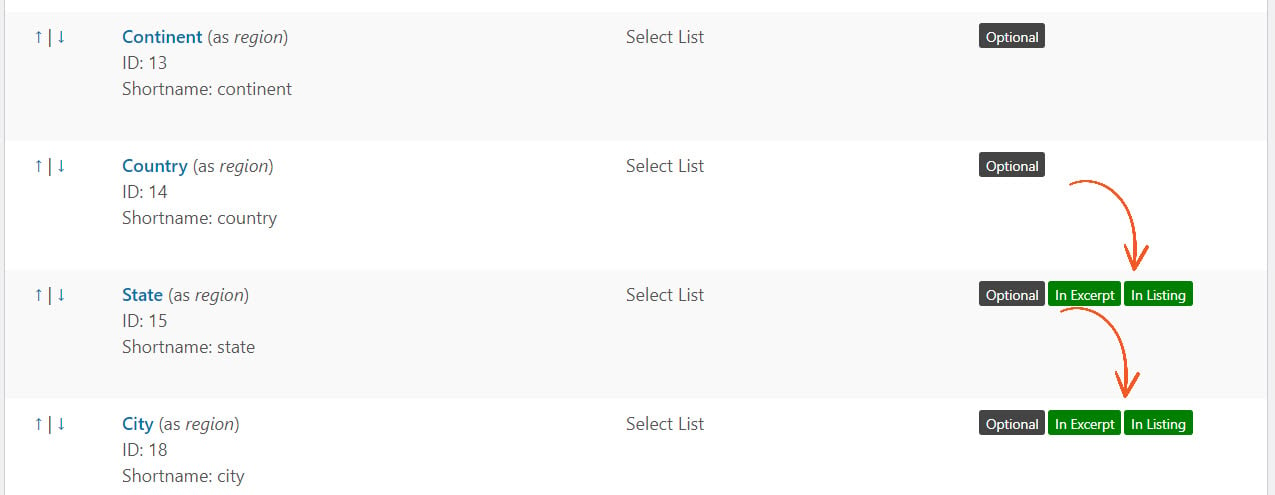
Regions Fields
Installing Regions module automatically adds 3 new fields to your configuration under Directory → Directory Content → Form Fields. They are as follows:
- State
- Country
- Continent
As you add additional levels to your Regions hierarchy, additional form fields will be added automatically by the plugin. For example, if you add the city Orlando to the state of Florida, the plugin will automatically create a new city field for you.
You can configure what Regions fields will show in your listings however you like in the Form Fields section of Business Directory, including their output order. For example, if you only want to show City and State for US listings, you might have something that looks like this:
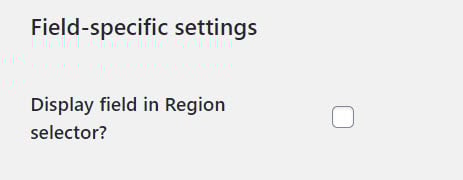
Display field in region selector?
There is also a setting in each form field itself that controls whether a level in the hierarchy is shown in the Regions selector (the dropdown list on the main page). The checkbox controls if the field is included in both the region selector and listing form.
NOTE: If you accidentally delete a Regions field, don’t panic. You can get it back by visiting the Regions tab under Directory → Settings → Regions → Actions. At the top, click to expand the Regions pane and click on “Restore Regions Form Fields”. Shown below at the bottom of the Regions admin screen:

Administration
The regions settings screen looks like this from Directory → Settings → Regions:

General Settings:
Hide Region Selector?: Turning on this option disables the Region selector that is shown in various places, such as the main directory or the search page. The Region selector looks like this (closed):
 Or (open):
 Show Region Selector Open by Default: Turning this option on leaves the selector open (image above) when the user first visits the page. Default is closed/off.
Show Post Counts: Turning on this option will display a count of the listings in that region when it’s shown on the sidelist or in a drop-down menu, like “Albany (3)”. Default is off.
Add Regions to Quick Search Bar?: Turning this on will add the Region field to the Quick Search bar available fields to use. It behaves similarly to the ZIP search option we show here: 
You must still click the link at the top of this tab (“Change the configuration here”) and select it to activate it as a “searched field”.
Sidelist Settings:
The next section is for the Sidelist of Regions. The Sidelist is the area next to the main directory that shows locations and listing counts.
The settings that control this are as follows:
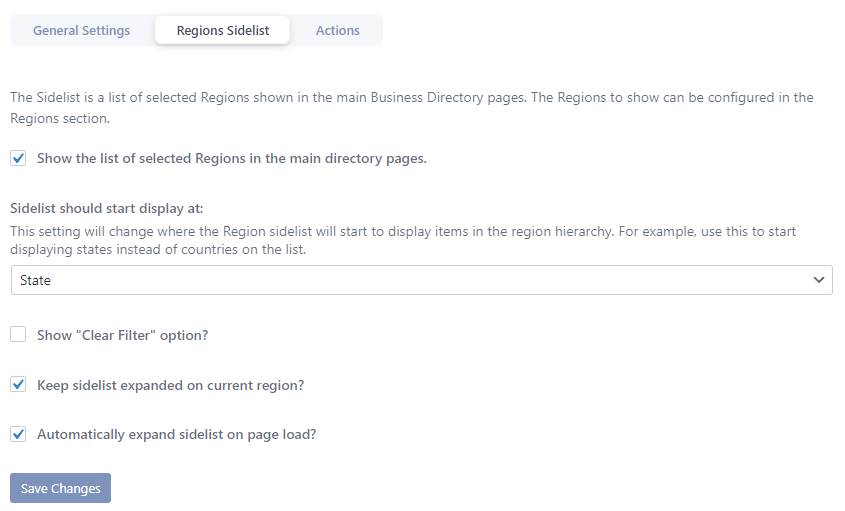
Show Sidelist: Turning on this option makes the Sidelist visible. Otherwise, no sidelist for regions will be displayed.
Sidelist should start display at: This setting will change where the Region sidelist will start to display items in the region hierarchy. For example, use this to start displaying states instead of countries on the list.
Show “Clear Filter” option: Turning on this option will display a “Clear Filter” link at the top of the sidelist when you have a region selected, shown below. Default is off. The link will only appear when your mouse is hovering over the region sidelist.
Keep Sidelist expanded on current Region: Turning on this option means that selecting a Region will collapse all other regions EXCEPT the current selected one in the hierarchy. Useful to highlight the selected region.
Automatically expand sidelist on page load?: Turning on this option means that the sidelist will fully expand when the page is loaded (all sub-regions will expand in the tree). Makes it “prettier” when the user loads the directory.
In addition to the settings above, at the bottom of the tab, there are some buttons to help you manage the regions settings and fields, in case something goes wrong.

You can use these buttons to restore the default regions, the region form fields (if you accidentally delete them), or restore the default settings of the Regions Module.
Regions SEO Settings
Go to the Directory → Settings → General → SEO page to find the URL-related settings.
Regions Slug
This is used in the URL when users are filtering for a particular region, like /wpbdm-region/new-york/albany, which happens in some searches or the Regions browser page. This must be a unique slug. A default slug is provided but you can change it as long as it doesn’t conflict with others.
Legacy Regions URLs
If you created any regions before v5.3, you might see this option. If you don’t see it, that means the site is not using legacy URLs.
Before v5.3, the links to each region included the directory page slug, and they were not hierarchal. This option will change the URLs for existing regions, so only uncheck this option if you are not concerned about the URLs changing.
Warning: This will change the URLs for any existing regions. Once off, this cannot be turned back on.
Managing the Region Hierarchy
The Directory → Directory Content → Regions screen is where all region configuration happens. Regions are configured as a hierarchy. You can make the hierarchy anything you like, we pre-configure it with the most common scenario, but you are free to use as much or as little as you like. The default is setup as follows:
Continent → Country → State
You can add counties, cities, villages, boroughs, whatever you like. The important thing to understand is which regions are parents and which are children, and to make the association accordingly. Each level of the hierarchy is displayed with a dash in front of it. So top level regions have no dash, first level (country) regions have a single dash, second level (state) regions have two dashes, and so on.
As you add or delete regions, the Regions Module will automatically change the Form Fields to add or remove the level of the hierarchy you create. These fields will have default names associated to them, but you can change them to whatever you like. The names of the fields are not important to Regions Module.
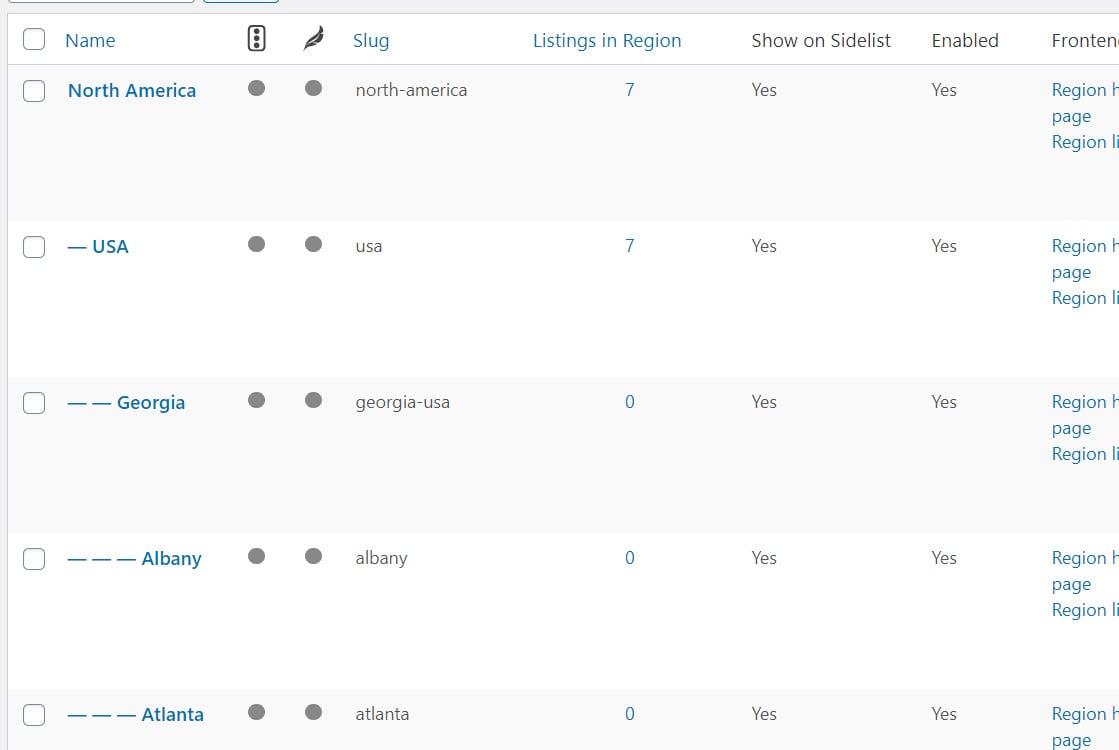
The Regions screen primarily uses a list of regions to work with (notice the top level region, North America (a continent) has a country (with single dashes) below it, and state (with two dashes) and a city (with three dashes):
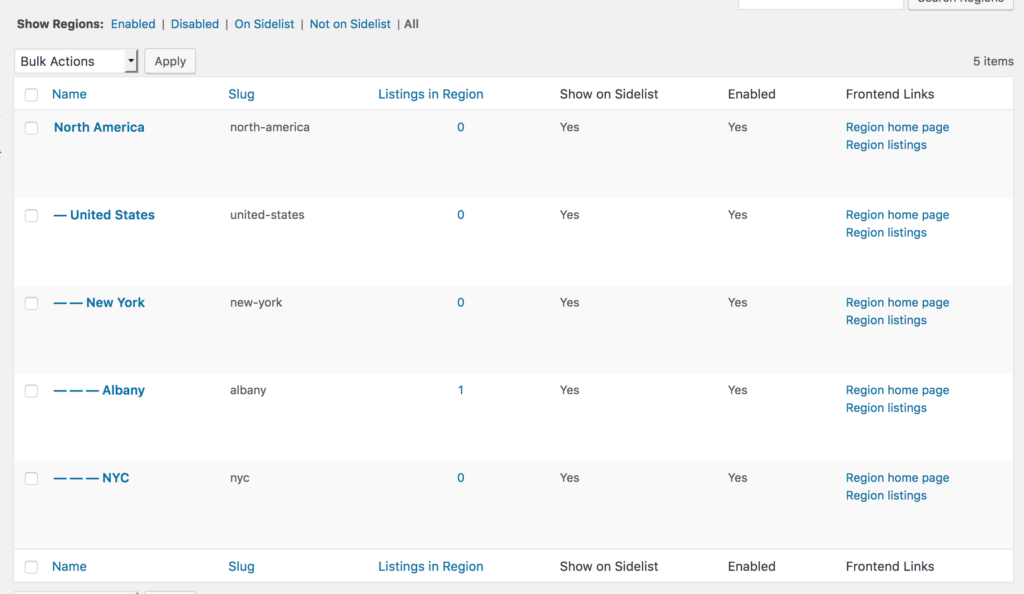
At the top of this list, you have various filters you can use to hide/show regions that you are interested in. Clicking Enabled will display all active regions (those that can be shown in the Region Selector, Search screen or Submit Listing screen), Disabled will show all inactive ones. Clicking All will return you to the master list of regions at any time.
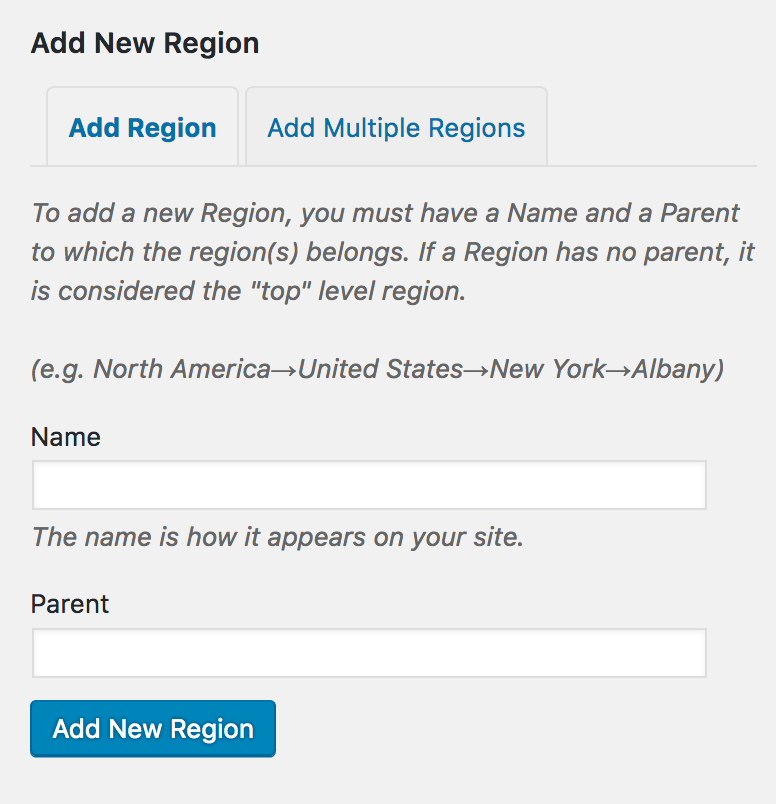
To add a new region, simply type the name of the Region in the Name field, specify the parent region of it (type slowly and the plugin will suggest a list of matching options), and then click Add New Regions. If you do not specify a parent, that region will become a top-level region. By default, top-level regions are Continents. You can configure your regions any way you like, continents do NOT have to be the top level–this is just how the default data set comes.
When you are working with regions, the operations you can perform on them are found when you hover the mouse over a particular region, like so:

The commands are as follows:
Edit: This will allow you to change the region name, slug and description on a separate screen.
Quick Edit: Similar to edit, but allows for in-line editing of the region info above.
Delete: Removes the region from the hierarchy. WARNING: Any child regions will ALSO be deleted as well, so be careful of this operation.
Enable/Disable: This will make a region active or inactive. Only active regions will show up in the Region Selector, the Advanced Search screen, and the Submit a Listing screen. A region must also be active to show on the side list.
How to Filter Listings By Regions
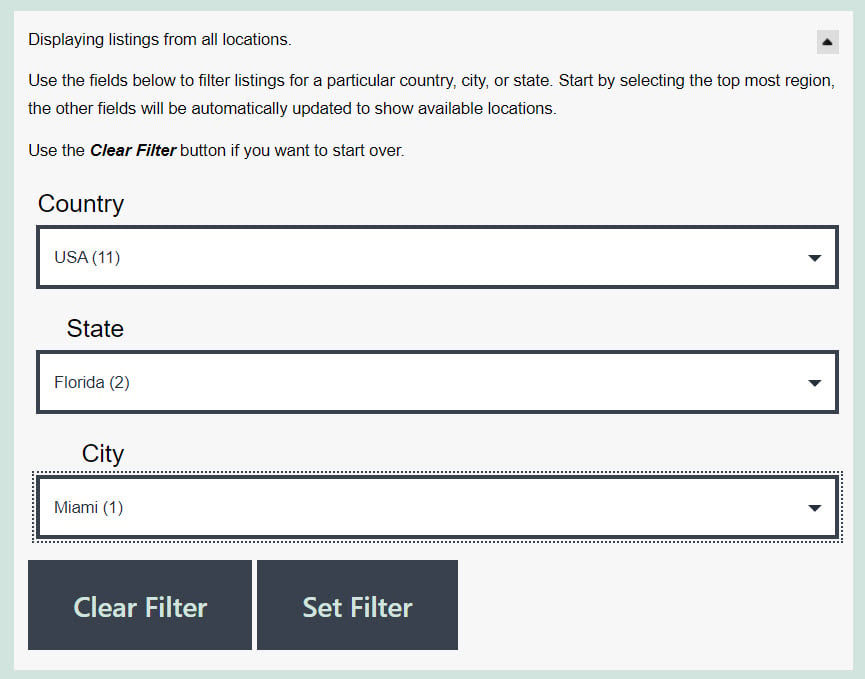
When you visit the Directory or View Listings pages, at the top, you will see the Region Selector (which by default will say “Displaying listings from All Regions” until you select something).
To the right of the region indicator is a drop-down arrow:

Clicking on it will open up the region selector:

When you start out, the first drop down will be the only one displayed. Clicking a region in it will create the control to select the next level (in this case, selecting “USA” caused the “State” drop-down to appear. Selecting “Washington” caused the City drop-down to appear.
When you have fully selected the desired region you wish to filter on, click Set Filter to set the region for filtering. Now, only listings from that region will be shown in View Listings and Directory, until you change it. In the above example, clicking Set Filter will cause only listings from Seattle, WA, USA to show up in the directory.
If you make a mistake or simply wish to see all listings, click Clear Filter and the drop downs will reset, allowing for a new selection.
How to Change the Regions Hierarchy
Modifying the regions hierarchy is done by defining the regions FIRST here in Directory → Directory Content → Regions. We found that it was easier to take your data and associate it to a series of fields, than the other way around. If you want to completely rework the default regions into your own setup, we recommend doing it this way:
- Delete all of the regions on this page that you don’t plan to use, starting with the PARENT regions you don’t want. (in the hierarchy Continent → Country → State → City, Continent is the PARENT of Country, Country is the PARENT of State, but the CHILD of Continent, and so on…). This will help get rid of LOTS of regions you don’t want to use
- If you don’t want Continent at the top of your hierarchy, you will need to delete ALL REGIONS and start from scratch. This sounds scary, but it’s not. You can always reset the data BACK at any time.
- Create the Regions you do want, starting at the TOP. Instructions for that below.
- When you are done, go to Directory → Directory Content → Form Fields
- Delete ALL of the fields that are of type “Region” (again, this sounds scary but it’s NOT!)
- Tell Regions to “restore the fields” by returning to Directory → Directory Content → Regions, and clicking the Restore Region Form Fields button. This will create NEW Region fields based on the NEW hierarchy you created.
- Now return to Directory → Directory Content → Form Fields. Your new fields will have names like “Continent”, “Country”, etc., which you can edit The hierarchy, though, is from PARENT → CHILD.
The Sidelist and Quick Filters
The sidelist allows you to have “quick filters” setup for regions you know will be of interest to your users. The side list appears like this in your directory on the View Listings and the Directory page, to the right of your listings and just below the button panel/region selector area:

When you click on a region in the sidelist, this will quickly set the region to match the one in the sidelist. Sidelist regions can also have sub-regions showing as well, such as this for USA (before and after pics):


By clicking on the button, that will open the sub-region list (States) for USA, allowing for further location filter refinement.
If you want a region on the sidelist, you must add it under the Directory → Directory Content → Regions area.
Adding cities to Regions in Bulk
The cities or other smaller regions will need to be added manually in the plugin, but you can do them several at a time.

To do this, go to Directory → Directory Content → Regions, then click on the Add New Region button.
Once you are there, you can easily write in the list of cities you want to add. You can also copy/paste lists of cities for each state in the box if you have them available, then associate those cities to the state you want. Then click the Add Regions button and those cities will be added:
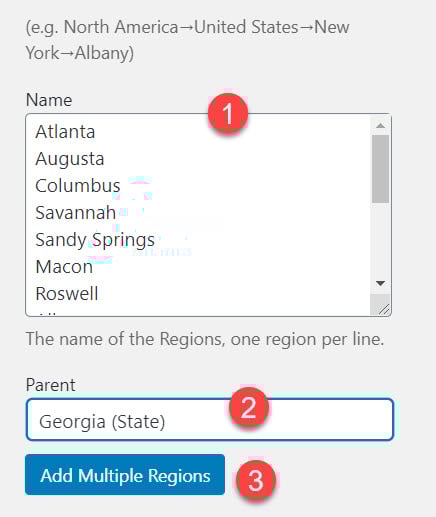
You can do a Google search for the phrase “text list of cities in Florida” (for example) to get a good list you can copy/paste. We recommend putting the list in a text editor like Notepad to remove any formatting that may be on the page where you have copied the information from.
Note: We have also identified this potential source of information on cities/locales that you might wish to use instead: https://developers.google.com/adwords/api/docs/appendix/geotargeting?csw=1
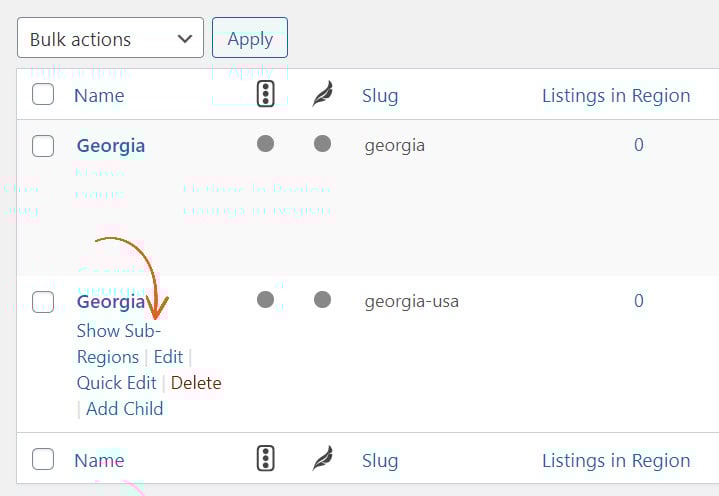
Enabling newly added cities
Once you have added the list of cities, they will need to be enabled. To do this, from Directory → Directory Content → Regions, search for the state you added cities for

On the results page, click on the region name (in this example, please note there is both a State and a Country called Georgia — be sure to select the right one!):
Once those are displayed, you can see the newly added cities:
Note for users of both the Regions Module and the ZIP Search Module:
You can choose to enable the Regions Module on the Quick Search menu, which adds the Located at <City, State> search field OR you can choose to enable the ZIP Search Module on the Quick Search menu, which adds a ZIP code field to the Quick Search.
Here is what the ZIP Search Module looks like when it is enabled on the Quick Search Menu:
Here is what the Regions Module looks like when it is enabled on the Quick Search Menu, if you have the regions filter enabled as well:
If you have enabled both modules in the Quick Search bar, then the Regions Module will take precedence. Only one of those options can be added to the Quick Search bar, so you must make a choice between the two modules here.
Shortcodes
Show Listings in a Region
[businessdirectory-region]
Displays a set of listings from a given region.
Learn more about [businessdirectory-region].
Example result:
Show List of Regions
[businessdirectory-regions-browser]
Shows the “Regions browser”, similar to what Craigslist shows on the home page when first visiting the site to pick your preferred location.
Learn more about [businessdirectory-regions-browser].
Example result:

Show Subregions
[businessdirectory-region-subregions]
Shows subregions of a region (parent). This shortcode displays a list of child regions from a specific region, defined by `parent_region` parameter.
Learn more about [businessdirectory-region-subregions].
Example result:

Filtered Directory Listings
[businessdirectory-region-home]
Shows the main directory page but filters automatically with the given region.
Learn more about [businessdirectory-region-home].
Example result:
Regions Module Troubleshooting
I’m getting a 404 error when I click on a Region.
This issue quite common with the Regions module and usually the problem is that permalinks need to be updated. To do that, go to Settings → Permalinks and click on Save Changes. This should bring back that page.
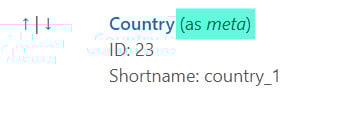
I see two city and state fields in my listings.
Usually, when this happens, it is because a Country and State field was created before you installed Regions, which adds another Country and State field. You will need to go to Directory → Directory Content → Form Fields and delete the field that looks like this:
And keep the field that looks like this:
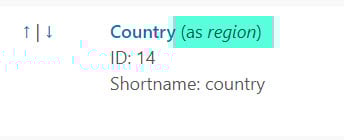
This may be true of any other Regions fields, like state, so please be sure to check for that.
It’s important that you keep the field with (as region) because that’s the field that the Regions Module uses.
If you find that you accidentally remove that field, you can re-create it, no problem. Just go to Directory → Settings → Regions and scroll to the bottom where you will click on the “Restore Region Form Fields” button:

My listings have city and state data in them, but they are not showing up when I filter for the city and state.
This is likely because of the field issue outlined above — the data you have listed for city and state, for example, aren’t in the right fields.
On the front-end of your listings, that might look something like this:
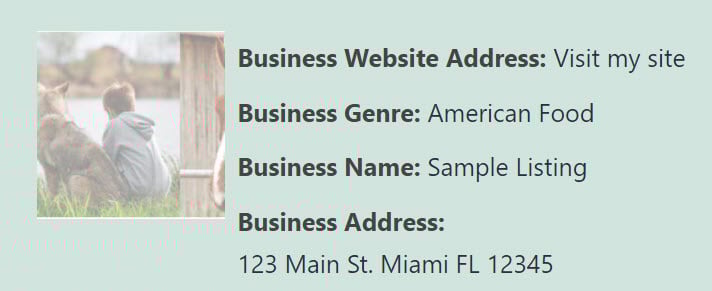
The listing looks great, but the Address field is not used by the Regions module for regional classification.
The data that the Regions Module uses for assigning a region to a listing is shown on the backend of the listing itself in the admin panel. It looks like this:

Your listings can certainly have data in both places to make the listing look nice, but the only place that the Regions Module will recognize the data is in the designated Regions field shown above. You can even keep both fields if you’d like, and choose one not to show up on the front end in the form field settings, but it is not recommended because it can get confusing.
I am getting a “no regions available” error.
This likely means that you need to add data to the Regions Module. Here is where we might see this message on the backend:

And here is what it looks like on the front-end of your site:
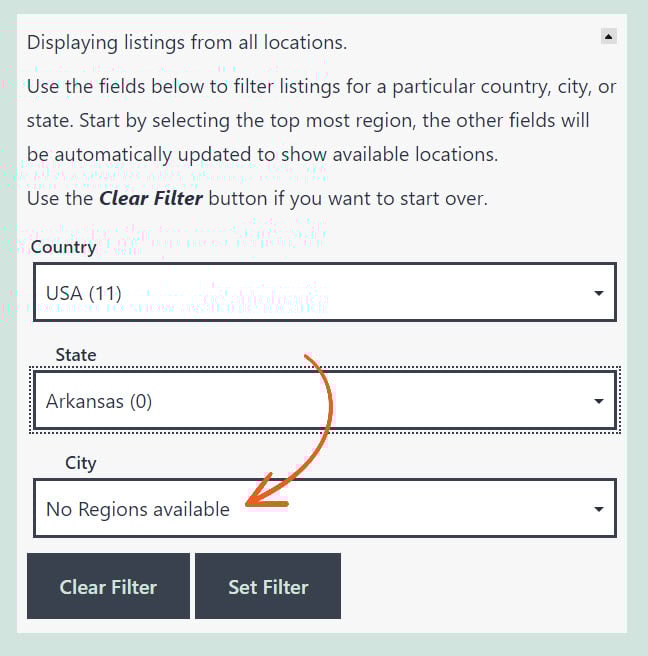
This occurs because you have added a level to your hierarchy (most likely city) for one particular region and not for another. For example, you have added cities in the region’s hierarchy for Florida, but you have not added cities for Arkansas.
To fix this, you will need to add the city-level data for all states. If you don’t want to do that, you can delete the data you have for cities in Florida and delete the City (as Region) form field under Directory → Directory Content → Form Fields and this will resolve the issue.
