
I found this plugin very helpful. It’s very easy to install, and it works flawlessly. Its free features are real. And its paid features are truly upgrades.


Last updated on March 10, 2022 by Business Directory Team
How to Create a WordPress Location Directory
Planning to create a location listing site? With the right tools, it can be pretty easy. Learn how to build a WordPress location directory in this post.

Location directories help people find their desired destinations easily. It comes in handy especially when someone needs the physical address of a place. It’s a popular concept these days.
Government agencies, businesses, and commercial listing sites often have a location directory. All of them share the same purpose- helping the community with location information.
Businesses and government organizations maintain a location directory to let their stakeholders know the locations of different facilities. These can be hospitals, utility service offices, and so on.
Commercial listing sites create location directories to monetize the traffic. They can earn from paid listings, ads, and more.
Business Directory is the best WordPress directory plugin. Get it for free!
Now that we’re clear about the purpose of a location directory. Let’s see what to include in a location listing site.
What to include in a location directory
A location directory is as simple as its purpose. Here, the visitors will expect to know the basic information about a location(s). With that being said, a location listing site should contain the following:
- Location title
- Description
- Address
- Contact information
- Website
- Map
Sounds neat, right? Let’s move forward.
Best tools to build a WordPress location directory
We need only a couple of tools to create a location-based WordPress directory. These are:
- A WordPress site
- Business Directory Plugin
As you can guess from the title, we’re going to build this location directory on WordPress. So, a WordPress site is a must. You can get a WordPress site from any WordPress hosting service. To get the directory functionalities on our site, we’ll need a WordPress plugin.
Business Directory Plugin is the best WordPress directory plugin. It has everything we want to build our location listing site.

You don’t need any drag-and-drop page builder or third-party WordPress theme. Whether it’s a location listing site or a real estate directory website, you can do it with Business Directory Plugin.
The plugin has both free and premium plans. The free version can be used to make a basic directory. But, to get the map feature and other premium add-ons+templates, we’ll use a premium plan in this post.
How to build a WordPress location directory
By now, we hope you’ve got your WordPress site up and running. It’s time to start building the WordPress location directory. Let’s do it!
Step 1: Install and activate Business Directory Plugin
First, visit the Business Directory Plugin pricing page. Compare all the plans. Ensure that your selected plan has the Google Maps module included. After purchasing the plugin, install and activate it on your site.
The installation step is simple. Still, if you’re new to managing a WordPress site, you may want some help. Check out our quick start guide to find everything about how to install Business Directory Plugin.
After getting the plugin active on your site, we’ll need to enable the Google Maps module. Visit WordPress Dashboard → Modules.
Activate the Google Maps module. It will need a Google Maps API key to work.

Also, you need to assign the location-related form fields to this module.
We have an easy-to-follow tutorial on how to use the Google Maps module. That will help you set this up.
To make your main directory archive look better, install the Enhanced Categories module. The main listing archive shows the directory categories. You can add thumbnail images to the categories using this module.
Step 2: Create location directory pages
In this step, we’ll create 2 listing pages. These are the main listing archive and the listing submission form. Both of them are vital to bringing directory listings to your website.
Main listing archive: This will be the main directory archive page. It will display a search tool with an advanced search option, some action buttons, and directory categories. You can add more content if you want.
To create this archive, we’ll insert the [businessdirectory] shortcode into a WordPress page. A standard WordPress page will work. Simply go to WordPress Dashboard → Pages → Add New.

Enter the shortcode into the page. Publish it.
You can set this page as your site’s home page from Appearance → Customize. Then your visitors will see the main directory archive when they visit your site’s main address.
Listing submission page: This page will provide a front-end form to submit location listing items to your site. Create another WordPress page and insert the [businessdirectory-submit-listing] shortcode into that. This will display the listing submission form.

You can add additional content to this page as well. Share this page’s link with your team and audience to let them add listing items. You can also link it from your menu bar.
Step 3: Get the form fields ready
To collect listing information, we’ll use a form. But, to get that form right, we have to create the desired form fields. We can do it from WordPress Dashboard → Directory → Form Fields.

For this tutorial, we’ll need the following form fields:
- Title
- Description
- Address
- City
- ZIP Code
- State
- Country
- Contact Information
- Website
The plugin has some built-in form fields. You can edit them and add/delete custom fields as you need. Our directory plugin for WordPress covers it all.
Step 4: Create the listing categories
As you already know, the main directory page shows the listing categories. You can create parent and child categories to keep your location listings organized. Let’s do it from Directory → Directory Categories.

Thanks to the Enhanced Categories module, we can add images to these categories. Those images will be displayed as category thumbnails on the main archive page.
Step 5: Set up the location directory plugin
Business Directory Plugin is so smart that you need very little effort to set it up. For a public directory, it comes with all the standard settings out of the box. If you need more information, please see our guideline on starting a listings site.
Do you want to offer paid listings? Then you need to do a couple of things.
Create plans: To charge the paid listing customers, we have to show them our pricing plans. They will then choose a plan and submit their listing under that plan.
Go to Directory → Plans to create pricing plans. A free plan is included to get started.

Activate payments: Adding the plans alone won’t let the users make payments. You need to provide a payment gateway on the site. Business Directory Plugin offers built-in support for Authorize.net. If you want to use PayPal, Stripe, and so on, add them using our modules.
After adding the payment gateway of your choice, activate payments from Directory → Settings → Payment.
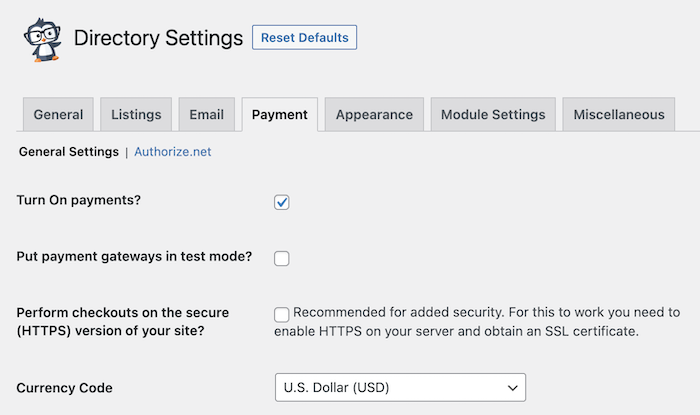
To learn more about payment settings, see our detailed documentation.
Step 6: Add location directory items
Our WordPress location directory is now ready to add listing items. So, let’s visit the Add Listing page.

Enter the applicable information and create the listing. It’s that simple.
Step 7: Style the WordPress location directory
Business Directory Plugin is not about just the plugin. It offers several dedicated directory templates as well. Explore all of them and choose one to use on your location directory. This will beautify the site and better present the listing items.
For this tutorial, we’ll use the Business Card theme. Get the theme and install it from Directory → Themes. Enable the theme.

For more information please refer to the theme docs.
After activating the Business Card theme, let’s take a look at our main directory page.

Below is a screenshot of the directory item archive.

And finally, here comes the listing detail view.

The single listing page will also have a contact form to reach the listing owner. These listing items are custom post types (also compatible with trackers like Google Analytics).
You can use the plugin’s CSV import/export feature to bulk edit/transfer the listings. It’s a complete package and advantage over Connections Business Directory or so on.
Wrapping up
We hope this tutorial was informative enough for you to build your location directory site. If you have any questions, please feel free to ask in the comments section. Happy developing!
Business Directory Plugin premium is 100% risk-free with a 14-day money-back guarantee. Get your suitable pricing package now and launch a location directory today!
This article may contain affiliate links. Once in a while, we earn commissions from those links. But we only recommend products we like, with or without commissions.